
Month: August 2021

How to Prepare for New Window Replacement

New Window Replacement Installation

Did you know that a new window replacement can get you tax credits? According to the Bipartisan Act, energy-efficient windows can get you tax credits worth $200.

New windows do not only increase energy efficiency but also increase the value of your home. However, they are a significant investment that can cause a dent in your pocket. The installation process in itself is pretty messy requires a lot of preparation.

If this is the first time you are replacing your windows, here’s how you can prepare your home. It can prevent mishaps and reduce the cleanup time. You need to keep an eye on several more things to ensure smooth work, which we have included below. This article walks you through everything you need to know about how to prepare for a new window replacement and what to look for to ensure the window is properly installed.

How Do I Prepare My House for Replacement Windows?

Windows installation process is a messy one, to say the least. However, it doesn’t take long to complete; a day or two at the max. You can speed up the process by preparing your home prior to the installation day. Here are few tips you need to follow to make the installation a quick and efficient one:

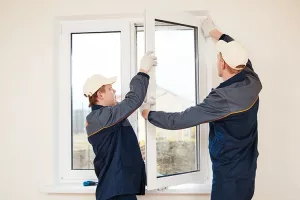
Make Way for Window Installers

When installing, the installers will need access to areas around the windows, both inside and outside. Ensure that nothing hinders their access. Furthermore, windows are heavy, especially the oversized ones. For an efficient job, remove things in their path, especially the stairs. You need not clear everything; move the furniture and area rugs for easy access.

Also, clear your lawn furniture, lawn decorations, and plants. You do not want them trampled in the process. Additionally, you also need to clear anything hindering access to the exteriors. Trim bushes and move the plants that are blocking the path. The installation crew needs at least 2 ft of free space to work with their tools. Heavy ones like bay windows require much more space than usual. If replacing upstairs windows, the installers will use ladders or scaffolding for access.

Finally, turn off the alarm systems in your home for the duration of the replacement.

Remove Wall Decorations and Window Treatments

Remove window treatments such as blinds, curtains, and drapes. If they are in good condition, you can also use them later on. Also, ensure that you remove anything fragile from the room. For example, remove any floating shelves, wall hangings, and paintings in the vicinity of the windows being replaced for the time being. A better approach would be to remove all the wall decorations from the room to minimize damage and dust.

Moreover, you may also have to remove interior shutters and hardware. However, it’s best to talk to the crew about hardware and remove those that aren’t needed. You do not want the crew wasting precious time on those that could be done early.

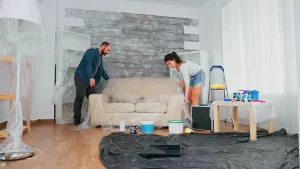
Protect Your Floor and Belongings

Installing windows and doors is dirty work. To protect your home from dust and dirt, the installation crew will put down drop cloths. They also do neat work to minimize the ensuing mess. However, these are not enough considering the dust. It is safer to take your steps to protect the furniture. Cover them with sheets or tarps to prevent them from getting dirty. You can also do the same with your floor.

An alternate solution is to rent a storage space or a portable storage bin. They come in various sizes. You can rent one to store your belongings during the installation process. This way, you can keep them in one location away from all the mess and mishaps.

Prepare a Separate Workspace for Installers

Set up a separate workspace for the installation crew. They will need space to set the windows and an electrical outlet to plug in their tools. Furthermore, it should be away from kids and pets. Ensure that your pets are locked away in a room for the duration of the work. Likewise, keep your kids away to ensure their safety and that of the crew.

What Should I Look for After Installing a Window?

The window replacement process doesn’t come cheap. However, considering the protection and the energy efficiency, it is worth every penny spent. But how do you know that they are installed in the right way? Here are a few things you have to look at to ensure proper installation.

New Window Replacement - Check It's Sealed Properly
  • Messy Caulking: Caulking is the first level of protection against outside elements. Since it takes up to a month to settle, you may want to revisit it in a month to check for gaps.
  • Stains on the glass: The various chemicals including glues used in the installation process can leave stains on the glass. However, the window installers should have removed it before completion.
  • Gaps: Look for gaps between the frame and the sill. You can spot gaps right away. This is a result of improper measurements or the frame being too large for the glass.
  • Water damage: When a window isn’t installed right, it can let in the rain. In due course, you will start to see water damage in the adjacent walls.
  • Drafty windows: New windows should not let in drafts or breeze of any kind. The minute you find the drafts, call the installation company right away. You are already facing a losing battle with energy bills.
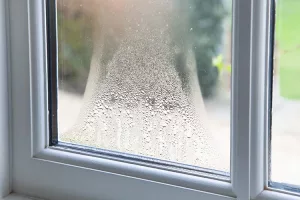
  • Foggy panes: Foggy panes are an indication of a bad seal. This means that the seal that keeps the gas inside the panes has been compromised.
  • Not in working order: A window that doesn’t open or close isn’t worth the money you invested. Again it is a troubling sign of improper installation.

Any issues, as mentioned earlier, can result in expensive repairs and damage to the structures close by, not to mention the high energy bills.

How Long Does It Take to Install New Windows?

Considering everything is in perfect order, it should take about 30 minutes to install a window. However, if your windows are on the second floor or higher, it will take longer. The same goes for custom windows, water damage, and waterproofing work. They can hinder progress and delay things.

Do You Replace a Window from the Inside or Outside?

Generally, replacement windows are installed from the outside due to the space and the comfort. However, it depends on the rough opening and the type of window. Your crew may also have to work from the inside as well. For example, in offset windows, it is easier to install from inside the home.

How Messy Is a Window Replacement?

Replacing windows is pretty much a messy process. There will be a lot of dust spread around the vicinity during installation. While the installer adds dropcloths, it cannot catch every bit of dust. Moreover, once the old windows are removed, there will be more dust from the frame.

Unless you add tarps, it is a losing game. Also, cover your furniture and other fixtures with plastic coverings to minimize the mess.

What to Expect When Replacing Windows

Whether you are upgrading or replacing broken windows, here’s what you can expect during the replacement process.

Couple Protecting Furniture with Plastic Cover
  • Permits: While it does not apply to all, homes in a hurricane zone will require permits for new windows. The same goes if you are changing the modifying the walls to accommodate a bigger window.
  • Schedule: Depending on the number of windows, it can take anywhere between 2-3 days. You may also want to consider the weather before scheduling the installation.
  • Get your house ready. Make way for installers and remove anything you do not want to be damaged. Also, cover the furniture and fittings to protect from the debris.
  • Installation: Ensure that your windows have arrived without any damage. Also, check the brand and the spec. Any issues with the above, take it to the contractor. Once the crew arrives, they will remove the old and install the new window, one at a time.

Always prepare for unforeseen circumstances. The company should communicate with you in case of any delay. Remember, any underlying issues can cost you more in time and money.

Conclusion

Planning and preparing your home ahead for a new window replacement will take time. Nonetheless, it will ensure that the process goes forward without any issues. The crew doesn’t have to waste time setting up, even though they take time to protect your belongings. It also prevents your belongings from being damaged. However, you may want to check with the company beforehand. Few prefer to do themselves to avoid liability issues.

On a final note, getting your home ready ahead of installation may take some time. But the result will be worth the effort. Not only does it help the crew, but it also reduces the risk of accidents. Before buying the windows, call the company for a free in-home consultation.

Assurance Builders was founded in 1998 with a commitment to provide our clients a personal and enjoyable home improvement experience. By offering professional workmanship and quality products, Assurance Builders has earned a reputation for excellent work and quality service. If you are in need of a window replacement in your home, contact Assurance Builders for your FREE quote today!

Your Guide to Installing Pre-Hung Doors

A door not only adds to the beauty of the room but also increases efficiency. Why not replace your damaged slab door with a pre-hung door? But first, what is a pre-hung door? A pre-hung door is one where the slab door is already attached by hinges to a three-sided doorframe. It is also pre-drilled, mortised, and pre-cut to receive the hardware.

Pre-hung doors simplify the installation process to a great extent. However, you need to be sure of the measurements and several other things. We will be considering the following main topics:

Pre-Hung Door Meaning

Pre-Hung Door Diagram
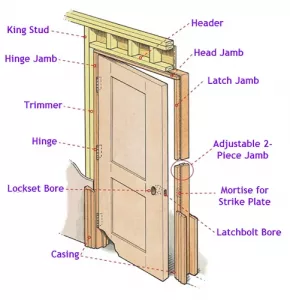
A pre-hung door is a complete door package consisting of a slab door, own frame, and hinges. However, you may have to add some features later on. It is a ready-to-go, self-contained unit that can be installed in the doorway.

Compared to regular doors, they are easy to install and simplifies the process. However, they require accuracy. And should be adjusted for the doors and jambs to fit right in the wall opening. If not, they may not hang well. In the case of exterior doors, they may not be as weather-tight.

Pre-hung doors come in a variety of sizes and materials such as wood, wood composite, metal, and fiberglass.

What Does a Pre-Hung Door Include?

A pre-hung door includes a door slab, three-sided door frame, and hinges. It is also a pre-cut hole for the doorknob, mortises, and strike plate. After installing, you need to paint/stain and fit the door with a knob.

Do Pre-Hung Doors Come with Trim?

Pre-hung doors can be of two types: one-piece jamb door that doesn’t have a trim. And a two-piece jamb door that has a trim (inside and outside) already applied to the frame.

How Long Does it Take to Install a Pre-Hung Door?

Installing a pre-hung door can take about 20 minutes to an hour at the max. However, it depends on factors including the expertise of the carpenter and correct framing. Interior doors do not take as long as the exterior since there is no weather-stripping. And this excludes the time taken to remove the existing door.

How Much Does it Cost to Install Pre-Hung Doors?

The cost to install a pre-hung door ranges between $400 – $1500. This is inclusive of both, material and labor. While this is a national average, the cost is also dependent upon the region and type of door.

Is it Hard to Install a Pre-Hung Door?

A pre-hung door is easy to install but it is still hard work for a novice not to mention the weight. You also need basic carpentry knowledge to get the job done to accurate standards.

Having said that, with a pre-hung door most of the work is completed for you. But you may have to take steps to ensure a proper fit especially the exterior door.

While installing a pre-hung door is pretty straightforward, it isn’t ideal for a DIYer or a novice. The door in itself is heavy and can leave you with a sore back. The frame, on the other hand, is flimsy prior to installing the unit. It is safer and cost-effective to have a general contractor or a carpenter fix it for you.

What Do I Need to Install Pre-Hung Doors?

Tools to Install a Pre-Hung DoorWith pre-hung doors, most of the work is already done for you. You need the following tools to install the door:

  • 2-foot level
  • 4-foot level
  • Plumb bob (Plummet)
  • Nail set
  • Hammer
  • Drill
  • Screw gun
  • Utility knife
  • Screwdriver
  • Small square
  • Chisel – 3⁄4 inch
  • 3-inch-long drywall screws
  • Wood shims
  • 8-penny finish nails

How Do I Measure for a Pre-Hung Door?

A pre-hung door comes with the frame already attached. While this makes installing easier, you need accurate measurements to purchase the right door.

Here’s how you measure the rough opening before buying a pre-hung door.

  • Remove the trim from the rough door opening to get an accurate measurement.
  • Make sure that the door studs stay level. If the studs are more than 1/4 out of plum, you need to level them out.
  • Measure the door studs on the opposite ends of the doorway for the width.
  • For the height, measure from the top of the rough opening to the floor surface.
  • To measure depth, take the measurements from the front edge to the back edge of the opening.

If you are replacing the door, you need the measurements of the frame. Here’s how you take measurements of the door and frame. Ensure that you write the measurement to the minute detail.

  • Use a painter’s pry bar to remove the casing from the door trim. Keep removing until you have pried out at the upper part and both sides.
  • Measure from stud to stud to get the width.
  • For the height, measure from the top of the frame to the floor closer to the right end. Move the tape to the floor surface on the left side of the door opening to the topmost part.
  • Finish by measuring the jamb depth.

How to Remove a Pre-Hung Door from an Existing Door Frame

If you are looking to replace a pre-hung door, you need to remove the existing door from the frame. Here’s how you do that.

  • Use a screwdriver and hammer to take out the hinge pins. Remove the door from the door frame.
  • Remove the strike plate and the hinge plate.
  • Use a stiff putty knife to loosen the trim.
  • Remove the trim using a pry bar without damaging the wall. If the trim is in good condition, you can reuse it.
  • Since the head and the inside jambs are nailed together, you can remove them at the same time.
  • Pry the side jambs and then the head jamb. Remove the door frame with care.

Interior Pre-Hung Door Installation

Prepare the opening ready to install the interior door. The door frame should be somewhat smaller than the opening to allow for adjustments. Furthermore, pre-hung doors are heavy and quite challenging to maneuver alone. Ensure that you have a helper to help hang the door.

Here’s how you install a pre-hung interior door:

  • Push in the pre-hung door through the rough opening. Add shims until the jamb is flat with the wall.
  • Double-check if the door opens in the right direction.
  • Check if the door is straight using a level. Slip shims to adjust the level;
  • Use a level or plumb bob to check the wall surface and trimmer studs for plumb.
  • Slip shims beneath the side jamb till the head jamb is level.
  • Fill in the spaces between the side jambs and the stubs by adding shims.
  • Shim between the hinges and the studs on the hinge side. Start with the top and bottom of the jamb. Position the shims so that half is above the hinge.
  • Do the same on the latch side too. Check the door level again.
  • Now nail the door frame through the shims and into the studs. Open and close the door; Make any adjustments as needed.
  • Fix the trim to the jamb and studs using nails with a spacing of 16 inches.
  • Install the trim on the other side in the same way. Trim the exposed shims.
  • Finally, attach the doorknob, backplate, strike plate, and lockset.

Exterior Pre-Hung Door Installation

Keep in mind, that a pre-hung door comes as one single unit. Consequently, everything has to be installed at once within a day. Else, you’d have a large hole in your home which is not ideal.

Here’s how you replace an exterior door in your home.

  • Remove the hinge screws from the jamb. Once the screws are out, take the door from the frame.
  • Remove the fasteners (screws or nails) holding it in place. Take out the interior trim from the door.
  • Install a z-flashing on the sill to prevent water damage.
  • Apply a bead of caulk to both sides right where the exterior trim meets the walls. And another across the floor where the threshold of the door will sit.
  • Insert the new pre-hung door top first so that the exterior molding slides beneath the z-flashing. Press the door so that it sits flush with the caulk.
  • Check if the door is level. If not add shims underneath until the bubble centers.
  • Drill holes through the hinges and secure the hinge-side.
  • Check the weather stripping. It should be in contact with the door, equal at the top, bottom, and middle.
  • Check for door plumb. And if needed shim above the screws on the latch side.
  • Drive in the screws in the top and bottom.
  • Close the pre-hung door. Shim above the middle screw and behind the strike plate. Drive in the last screw to attach the strike plate.
  • Apply a neat bead of caulk between the siding and the exterior trim.
  • Once it cures, fix the doorknob. Remove the excess shims with a utility knife so that it is flush with the door frame.

Pre-Hung Door vs Slab Door

A slab door is simple solid wood or a hollow core (just the door) without hinges, a frame, or any other hardware you may need. Some have the cutouts for a doorknob while others do not. It requires additional preparation before it can be installed.

On the other hand, a pre-hung door is an all-in-one unit that comes with a doorknob cutout, frame, door slab, hinge, and hardware. More expensive than a slab door, they are ready to install except paint or stain.

When it comes to choosing between a pre-hung or slab door, finding someone to assist the installation takes precedence. Here are a few other factors that influence your choice.

Pre-Hung Door Versus Slab Door Pros & ConsCost

Cost-wise, slab doors are less expensive than pre-hung doors. The price, however, depends on the door type and design. While the initial cost may be low, it can be driven up by the hardware and installation costs. In the case of a pre-hung door, even though it is costly than a slab door, the cost of installation is pretty low. With basic carpentry knowledge, you can install them yourselves. This makes it cost-effective than the former.

Appearance

With respect to appearance, you have more design flexibility with a slab door. You can choose a door that fits your home and even alter it to your needs. But with a pre-hung door, you cannot do much about the design.

Ease of Use

A slab door requires you to measure and cut the door to fit the frame. You may also have to purchase, mark, and install the hardware too. Unless you have installed hinges, mortices, and doorknobs before, it may prove to be a difficult task. With a pre-hung door, you get everything measured and pre-cut. However, it is quite heavy and may be difficult to fix alone unless you have help.

Installation

Slab doors are ideal when you have an existing door frame. And on the condition that the new door is identical to the old door and of the exact same size. Pre-hung doors, on the other hand, are ideal for a rough opening especially if the door frame hasn’t been built yet.

Conclusion

Pre-hung doors are ideal if you are constructing a new room. Or if your frame is too damaged to use it again. On the other hand, if you are retaining the frame, slab doors are your best choice. However, any difference in screw locations or door size can make the installation challenging.

Keep in mind, you need to retain the packaging intact when installing pre-hung doors. This is to secure the door and also to prevent it from opening before you install the unit.

Installing a pre-hung door is not one for novices, particularly the exterior doors. They are heavy and require some measure of experience. If you do not have any, hire a carpenter or a contractor.